My story and research
I am and always been a LUKS lover, so much that I crypt every my drive with it, even USBs! (a bit overkill, but ehi! that’s me u.u)
Problem is that in the late 2019, I noticed that my nvme, a Samsung SSD 970 EVO 1TB, was not performing as well as I expected… I was indeed only writing at 1400 Mbps while it was advertised for over 3000 Mbps! That’s half the speed!
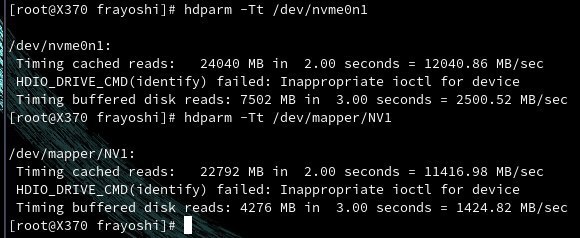
Initially I though okay, must have been an exaggeration from the company! Then I took a test with hdparm and the results were stunning! I got 2500 MB/s just by testing over the non-enctyped drive!
for the test I used hdparm -Tt /dev/nvme0n1 against hdparm -Tt /dev/mapper/nvme and the results speak for themselves:
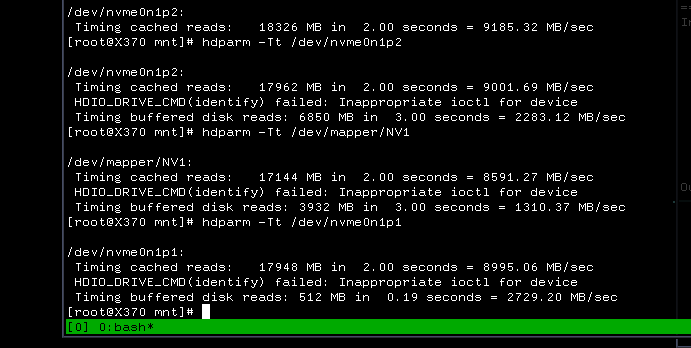
- hdparm m2 tests before OPAL2
- a blog post from the Morrolinux’s telegram group I shared at the time 🤓
After that, I started searching around… there must be a solution! And found out about Hardware Encryption! Yes, but I read a lot about SED being unsecure… ended up I was wrong! Seems like it was a problem of older certifications, but OPAL2 was different, cool! ⭐
My search continued, but documentation was almost non-existent for these kind of things.. So I started experimenting by myself and ended up with this guide, which I hope will help you! As the situation doesn’t seems got a lot better in 3 years.. or at least, this is what I have been told! Which is the reason why I decided to finally publish these notes 😊
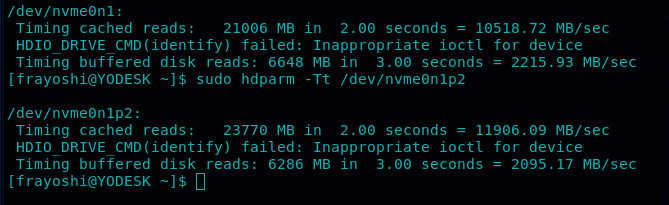
I had no noticeable loss of performance since I started using OPAL2 instead of LUKS for my nvme drives (which I use as big RAID0 cache)
It’s now 3 years that I am using HW encryption and counting 5 drives with it. 2 NVME and 3 SSD 🙂 Always look for the OPAL2 certification when buying new drives now! ✅
Here some supplementary pictures I took during my tests:
- pre format
- pre format dd

- xfs no encryption

- nvme m2 - btrfs OPAL2
The Guide
Sorry if not too much curated but or this or I was never gonna publish it, years have already passed and you might need it now! ^^
Use the namespace for the nvme drives not the controller, else it won’t work.
example: /dev/nvme0n1 nvme number 0, namespace number 1.
Standby will no longer work, unless you follow this guide afterwards (and still might remain problematic! Have problems with the Desktop sometimes, but never with the laptop). This is because the drive locks when entering hybernation or standby and cannot longer be unlocked by default.
the hidden EFI partition
Special attention must be given to the installation of GRUB if you use it, as we are gonna install a shadow EFI and the boot loader will not know what to load and miserably fail, unless we specify --removable as option during the installation. You will need to re-install It if you are not starting from scratch, else.. keep a live disk ready, you’ll need it. Keep it anyway, it’s always handy to have! Related wiki entry: https://wiki.archlinux.org/index.php/Unified_Extensible_Firmware_Interface
grub installation example:
grub-install --target=x86_64-efi --efi-directory=<efi-dir> --bootloader-id=<ID> --removable
If you are locked out because the option flag has been forgotten, a solution is to mount the EFI partition via a UEFI shell in the live iso of Arch Linux for example, via this command: fs<n>:EFI\GRUB\grubx64.efi where <n> is the disk number, it might be fs0 as fs5 or else.
flash the ISO
For the installation, we need the Sedutil ISO which will be composed of a live system needed to activate the OPAL2 encryption.
Flash the ISO and boot it.
pre-boot authentication
The base user is root and has no password.
Load the drives and preboot authenticate with linuxpba, where the password is debug. Don’t mistype, it will cost you a reboot! God only knows how many times happened to me, it gets really frustrating!
If the output has too many lines for your monitor, you can use linuxpba | tee -a list instead, or linuxpba > list and then less list. Also just tee without the -a and the argument, if you like it better.
verify if and which disks support OPAL2
To verify which and if the disks are OPAL2 enableable, use sedutil --scan.
The 2nd column must be “2”. If it is something else, please don’t continue, I have not tested on non-compatible drives and don’t know what could happen! (probably will just reboot)
If you see a “12”, it means you are OPAL1 and OPAL2 compliant with that drive.
references:
- samsung authorization via PSID: https://github.com/Drive-Trust-Alliance/sedutil/issues/291
- then: https://github.com/Drive-Trust-Alliance/sedutil/issues/248
- and ultimately: https://github.com/Drive-Trust-Alliance/sedutil/wiki/PSID-Revert
verify if is possibile to proceed
Verify if we can proceed with
sedutil-cli --query <device>
if Locked = Y or LockingEnabled = Y are there, then it is a good sign.
prepare the drive for encryption
The PSID is written on the label, behind the drive (yes, I’m sorry). It acts as a sort of password to erase the data on the drive and is used this way:
sedutil-cli --yesIreallywanttoERASEALLmydatausingthePSID <PSID> <device>
Double Check the CAPital Letters, else you will NEED to ReBOOT! As the authentication would be lost and all you’ll be left with is a lbaf:255 error code.
enable locking and the PBA
Now that we got access to the drive, we can give it the initialsetup
For first we enable the locking and the PBA
Enter the following commands. Testing password is debug, will be changed later. The drive used for the example is /dev/nvme0n1, if you have a SATA drive might be /dev/sda or else. No partitions in here!
sedutil-cli --initialsetup debug /dev/nvme0n1
sedutil-cli --enablelockingrange 0 debug /dev/nvme0n1
sedutil-cli --setlockingrange 0 lk debug /dev/nvme0n1
sedutil-cli --setmbrdone off debug /dev/nvme0n1
gunzip /usr/sedutil/UEFI64-n.nn.img.gz <-- Replace n.nn with the release number.
sedutil-cli --loadPBAimage debug /usr/sedutil/UEFI64-n.nn.img /dev/nvme0n1 <-- Replace n.nn with the release number.
little side note: (loadPBAimage is written with the CAPITALS on the sedutil manual)
test the drive
Testing is always good for these delicated operations. We can do it with linuxpba | tee and the result must be “is OPAL Unlocked” and not “is OPAL NOT LOCKED”.
modify the password
Choose now a strong password. If we are encrypting multiple drives, we can use different passwords and reboot for each of them or choose the same password for all of them and unlock all the drives at once (suggested, if you don’t want to spend minutes typing passwords and re-booting).
sedutil-cli --setsidpassword debug strongpassword <device>
sedutil-cli --setadmin1pwd debug strongpassword <device>
test the password:
sedutil-cli --setmbrdone on strongpassword <device>
reference: https://github.com/Drive-Trust-Alliance/sedutil/wiki/Encrypting-your-drive
finishing
shut the machine down completely with poweroff. No reboot, we need to clean the memory.
wait a couple of seconds, powen on, pre-boot authenticate and hopefully, enjoy. 😎
(It will reboot automatically, don’t worry it’s normal and will do it every morning)
supplementary notes
same command used to test the password works on a running system.
more commands like unlock, here: https://chrisarges.net/2018/02/16/using-sed-encryption-on-disks.html
i.e.
sedutil-cli --disableLockingRange 0 <pass> </dev/sdX>
sedutil-cli --setmbrdone on <pass> </dev/sdX>
The End
Hope this guide helped you in securing the system and on restoring your nvme speeds!
Thanks for reading up to here! Consider a donation or using one of the affiliate links, if you feel to!
It will give me motivation to keep sharing notes and libre media 😊